


IT teams face mounting challenges as they manage increasingly complex infrastructure and applications, often spending countless hours manually identifying operational issues, troubleshooting problems, and performing repetitive maintenance tasks. This operational burden diverts valuable technical resources from innovation and strategic initiatives. Artificial intelligence for IT operations (AIOps) presents a transformative solution, using AI to automate operational workflows, detect anomalies, and resolve incidents with minimal human intervention. Organizations can optimize their operational efficiency while maintaining security as they manage their infrastructure and applications.
You can use Amazon Q Developer CLI and Model Context Protocol (MCP) servers to build powerful AIOps solutions that can reduce manual effort through natural language interactions. Amazon Q Developer can help developers and IT professionals with many of their tasks—from coding, testing, and deploying, to troubleshooting, performing security scanning and fixes, modernizing applications, optimizing AWS resources, and creating data engineering pipelines. The MCP extends these capabilities by enabling Amazon Q to connect with custom tools and services through a standardized interface, allowing for more sophisticated operational automations.
In this post, we discuss how to implement a low-code no-code AIOps solution that helps organizations monitor, identify, and troubleshoot operational events while maintaining their security posture. We show how these technologies work together to automate repetitive tasks, streamline incident response, and enhance operational efficiency across your organization.
This is the third post in a series on AIOps using generative AI services on AWS. Refer to the following two posts for building AIOps using Amazon Bedrock and Amazon Q Business:
Solution overview
MCP servers act like a universal connector for AI models, enabling them to interact with external systems, fetch live data, and integrate with various tools seamlessly. This helps Amazon Q provide more contextually relevant assistance by accessing the information it needs in real time. The following architecture diagram illustrates how you can use a single configuration file, mcp.json, to configure MCP servers in Amazon Q Developer CLI to connect to external systems.
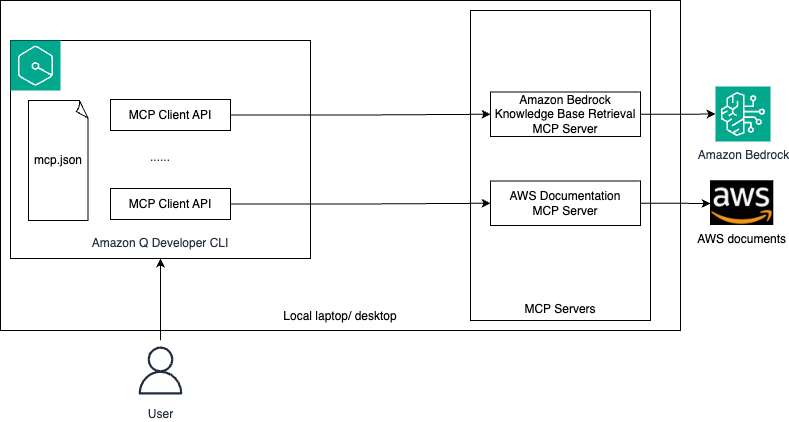
The workflow consists of the following steps:
- The user configures an MCP client in Amazon Q Developer CLI using the
mcp.jsonfile. - The user logs in to Amazon Q Developer CLI and asks operational queries in natural language.
- Depending on your query, Amazon Q decides which MCP servers that you configured or existing tools to invoke to perform the task.
- The MCP server interacts with the respective external system to get the live data that is used by Amazon Q to perform the required task.
In this post, we show how to use Amazon Q Developer CLI to address the following operational issues:
Prerequisites
Complete the following prerequisites before you start setting up the demo:
Configure MCP in Amazon Q Developer CLI
MCP configuration in Amazon Q Developer CLI is managed through JSON files. You will configure the Amazon Bedrock Knowledge Base Retrieval MCP Server. At the time of writing, only the stdio transport is supported in Amazon Q Developer CLI.
Amazon Q Developer CLI supports two levels of MCP configuration:
- Global configuration – Uses
~/.aws/amazonq/mcp.jsonand applies to all workspaces - Workspace configuration – Uses
.amazonq/mcp.jsonand is specific to the current workspace
For this post, we use the workspace configuration, but you have option to use either of them.
- Create a new workspace folder, and inside that folder, create the file
.amazonq/mcp.jsonwith the following content:
See the AWS MCP Servers GitHub repository for an updated list of available MCP servers.
- Open a terminal, navigate to the workspace folder that you created, and run the following command to log in to Amazon Q Developer CLI:
- Follow the instructions to log in to Amazon Q Developer on the command line.
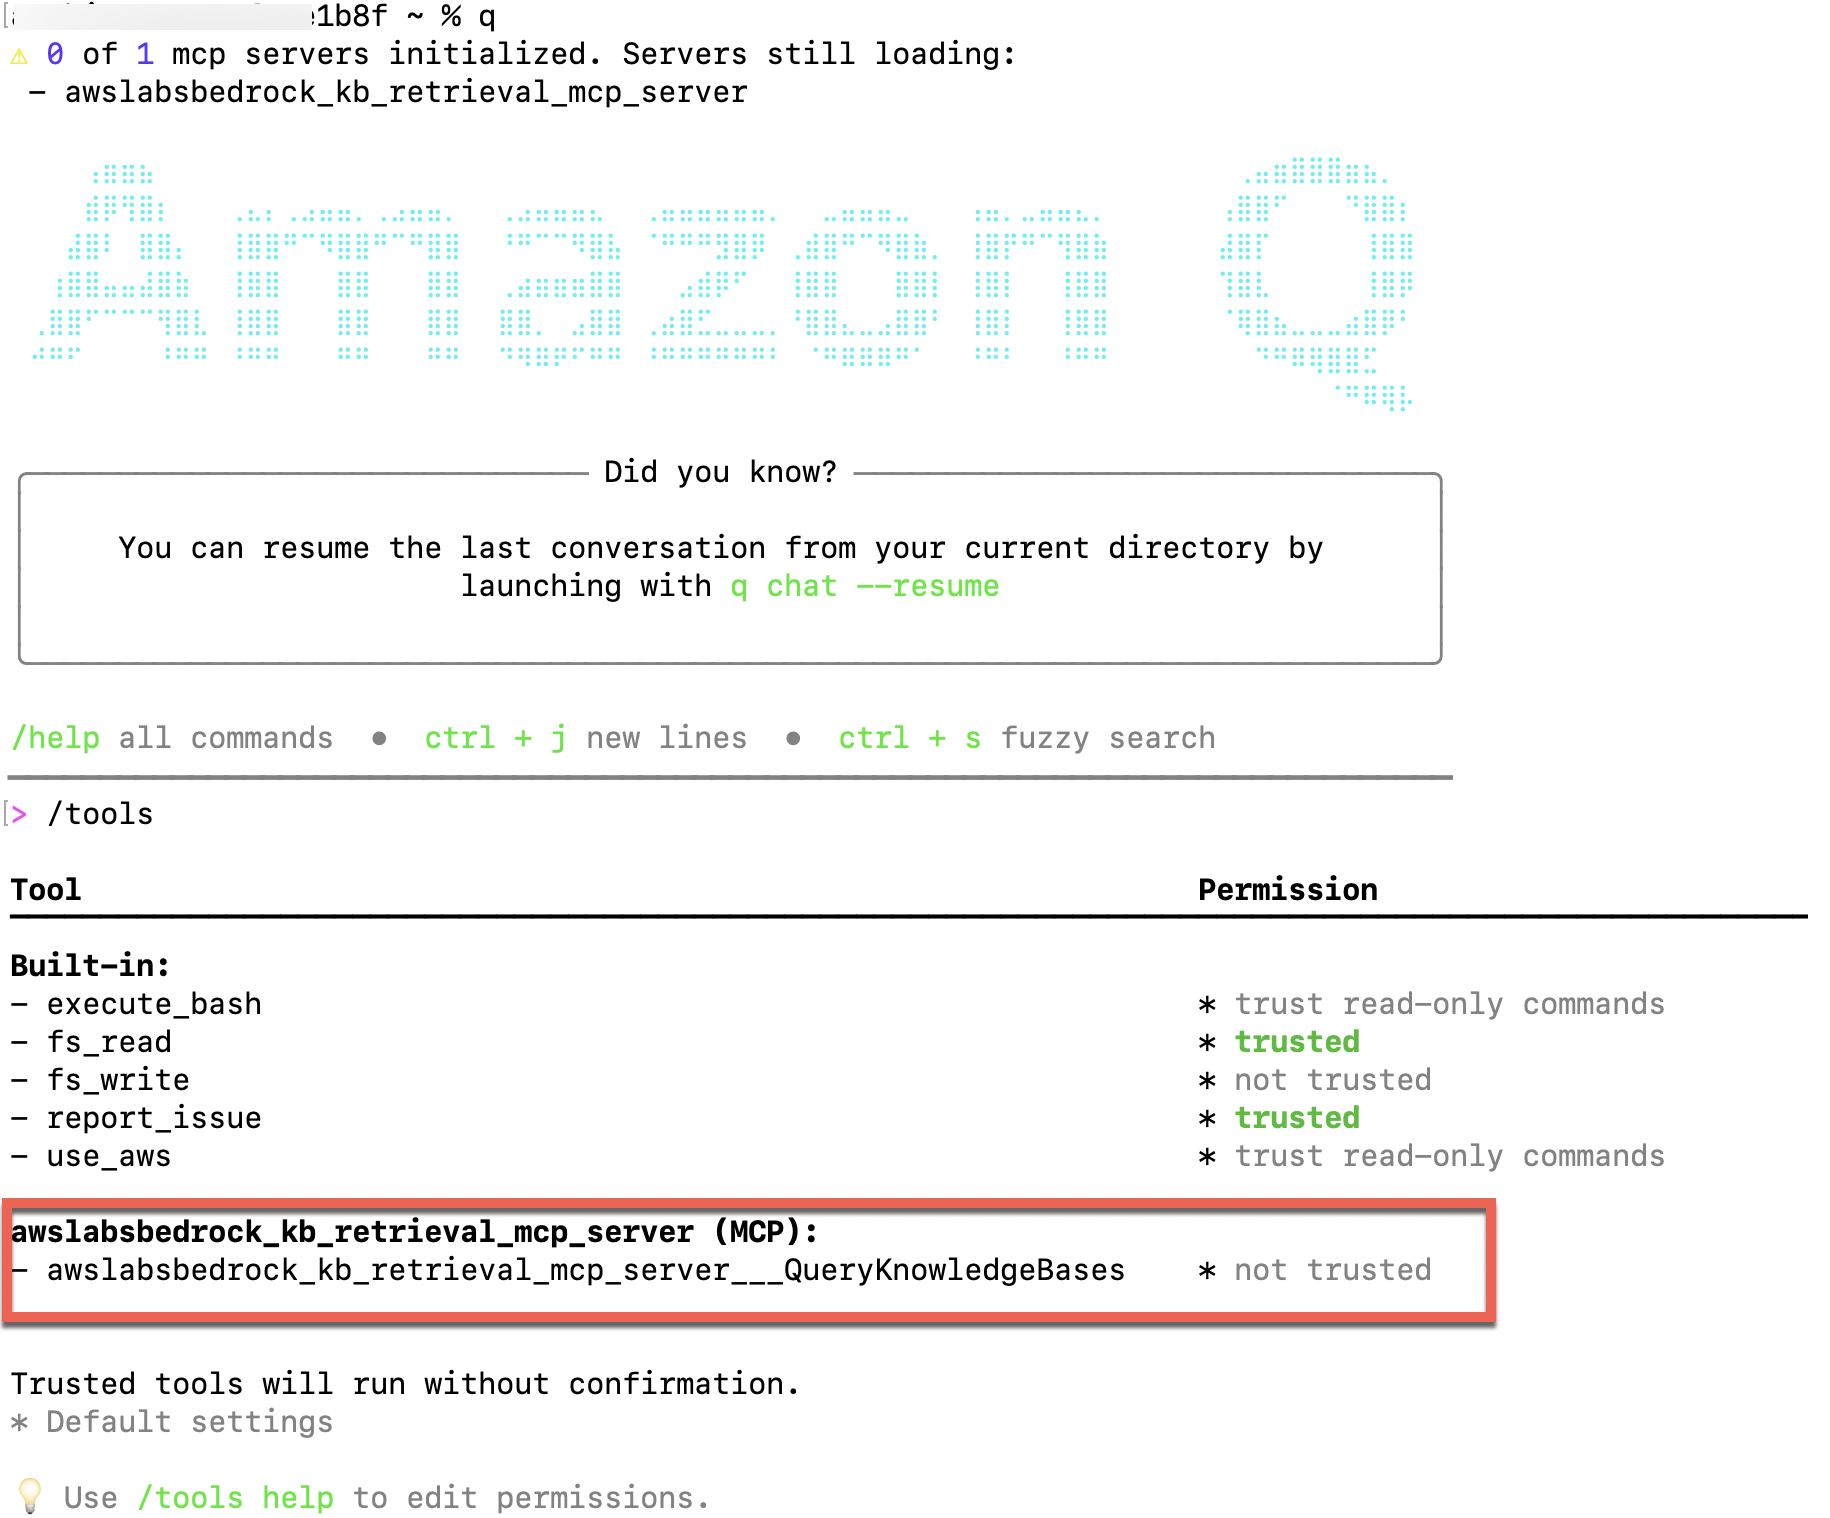
- Initiate the chat session by running
qand then run/toolsto validate that the Amazon Bedrock Knowledge Base Retrieval MCP server is configured.
Tool permissions have two possible states:
- Trusted – Amazon Q can use the tool without asking for confirmation each time
- Per-request – Amazon Q must ask for your confirmation each time before using the tool
By default, this tool will not be trusted.
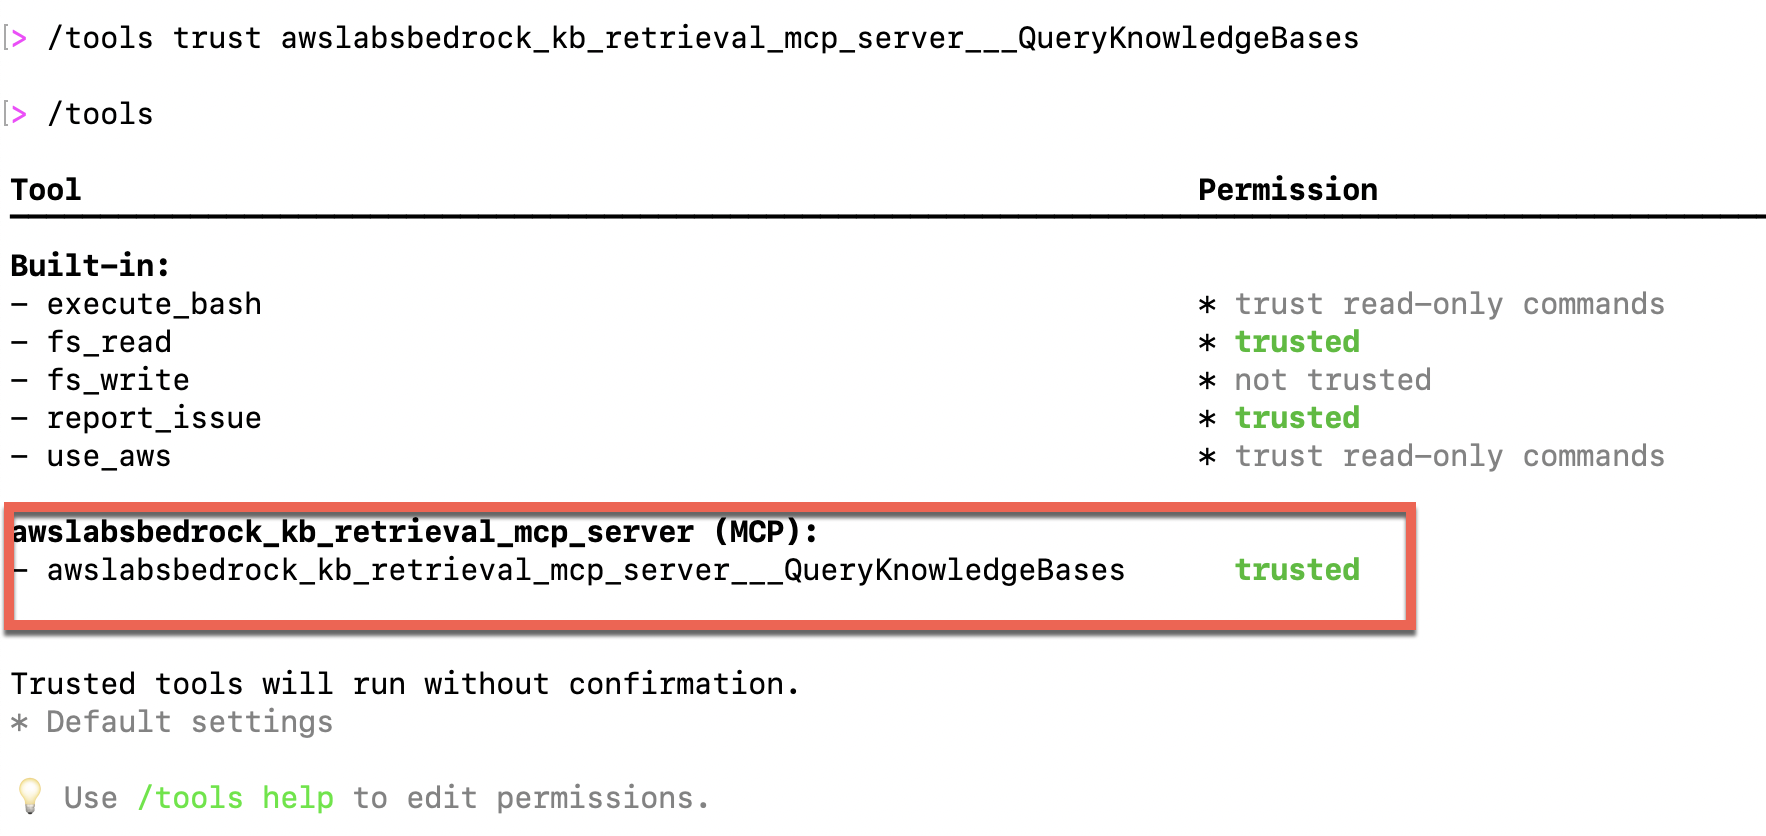
5. Run /tools trust awslabsbedrock_kb_retrieval_mcp_server___QueryKnowledgeBases to trust the MCP server.
6. Run the /tools command again to validate it.
Deploy AWS resources
Deploy the following AWS CloudFormation template to deploy the AWS resources that you will use to test AIOps. You can deploy this template in either the us-east-1 or us-west-2 AWS Region. You can deploy it in other Regions by updating the applicable AMI IDs in the template. This template will deploy two EC2 instances and three S3 buckets.
This CloudFormation template is for demo purposes only and not meant for production usage.
Validate that the template deployed two EC2 instances, which are in Running state.

Additionally, validate that the template created three S3 buckets with the names aiops-qdevcli-bucketX-aiops-qdevcli-

Create an Amazon Bedrock knowledge base
Upload the sample high CPU utilization runbook to the aiops-qdevcli-
Use case 1: Identify and remediate high CPU utilization in an EC2 instance
In this use case, you introduce CPU stress in one of the EC2 instances and then use Amazon Q Developer CLI to identify and remediate it.
- On the Amazon EC2 console, log in to the
aiops-qdevcli-high-cpu-utilinstance using EC2 Instance Connect. - Run the following command to install
stress-ng:
- Run the following command to stress the EC2 instance for 1 hour:
You must wait approximately 10 minutes for the Amazon CloudWatch alarm to get triggered.
- Return to the Amazon EC2 console and check that the
aiops-qdevcli-high-cpu-utilinstance is currently in Alarm state. - From the Amazon Q Developer CLI, use a natural language query to check for operation issues in your account. Use the knowledge base ID that you saved in the previous section.
Amazon Q Developer CLI autocorrects the errors that it encountered while running the commands.
Watch the following video for more details.
Due to the inherent nondeterministic nature of the FMs, the responses you receive from Amazon Q Developer CLI might not be exactly the same as those shown in the demo.
Use case 2: Identify and remove public access from an S3 bucket
In this use case, you will simulate an accidental security issue by unblocking public access for one of the buckets and then use Amazon Q Developer CLI to identify and remediate the issue.
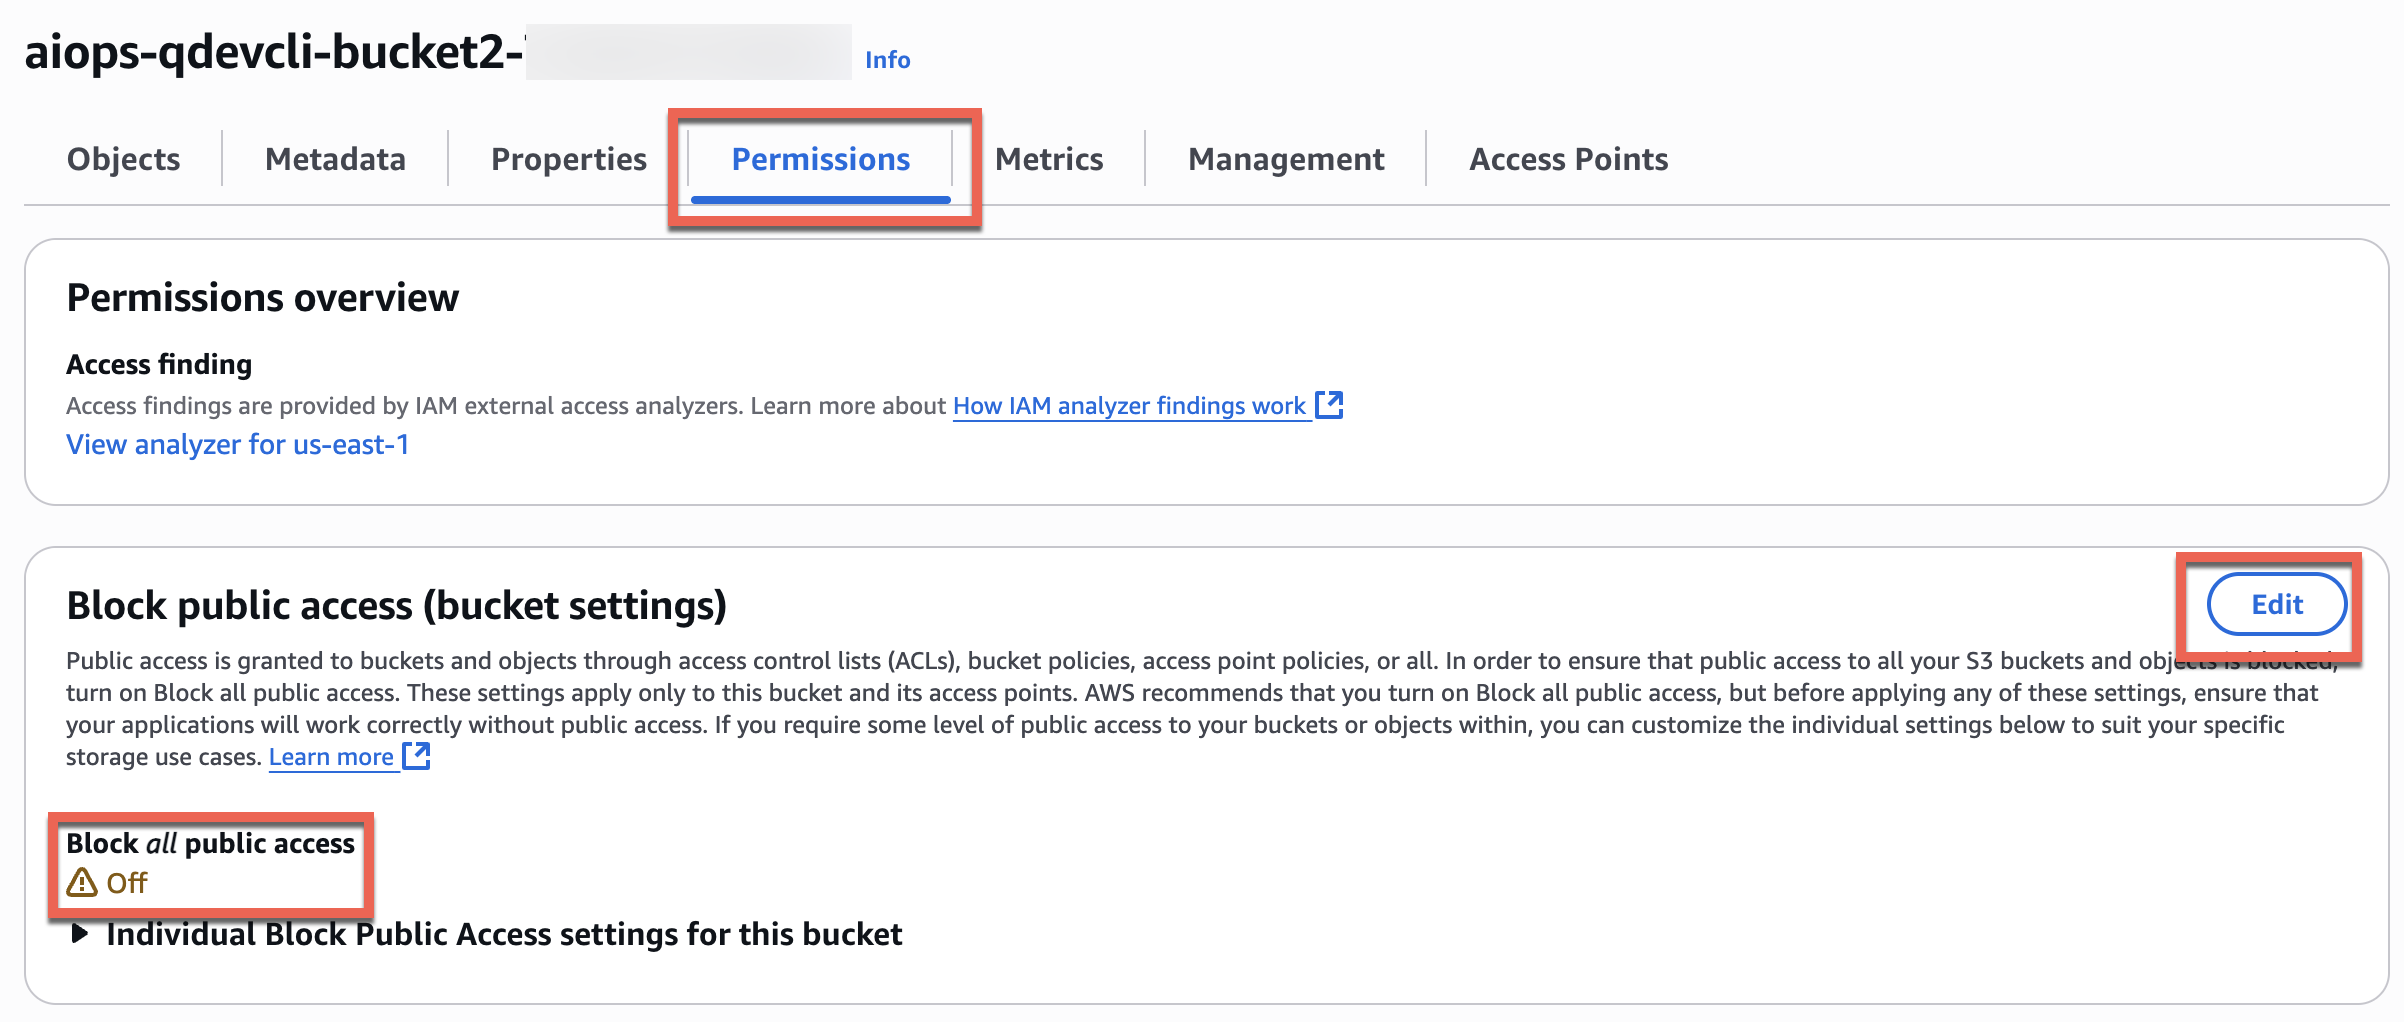
- On the Amazon S3 console, open one of the
aiops-qdevcli-xxxxbuckets, and on the Permissions tab, choose Edit and change Block all public access to Off.
- Return to the Amazon Q Developer CLI and ask questions in natural language to identify and remediate the operational issue.
Watch the following video for more details.
Use case 3: Identify and block a specific unwanted open port for inbound connection to an EC2 instance
In this use case, you will use Amazon Q Developer CLI to identify the EC2 instance that has a specific port open and then close the port.
- On the Amazon EC2 console, note that the
aiops-qdevcli-open-port-demoinstance has port 5080 open for all inbound TCP connections. This is an unwanted security risk that you want to identify and remediate.
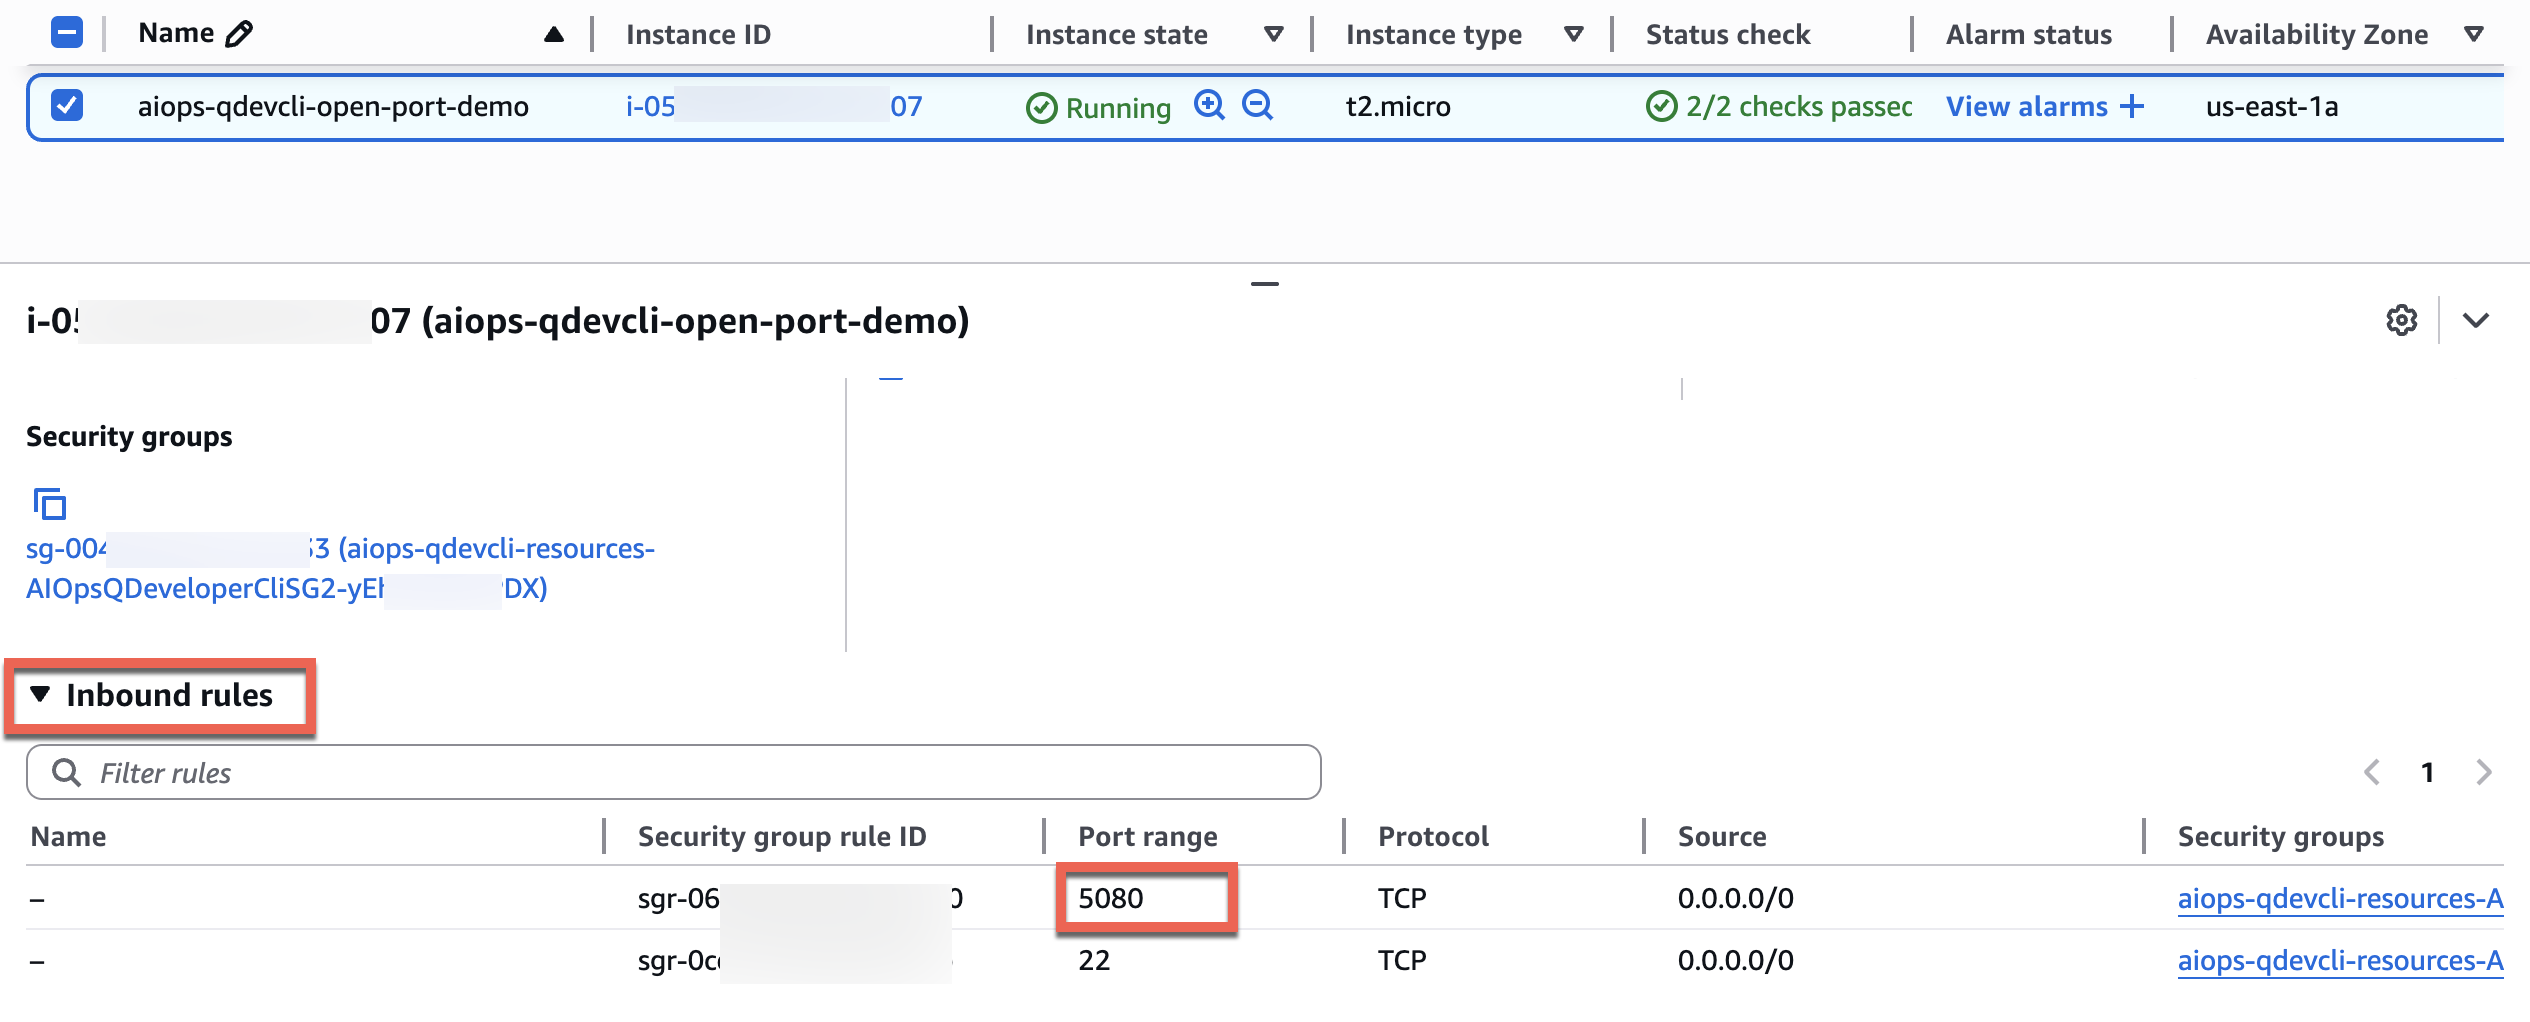
- Return to Amazon Q Developer CLI and use natural language queries to identify the EC2 instance with port 5080 open and fix the issue.
Watch the following video for details.
Clean up
Properly decommissioning provisioned AWS resources is an important best practice to optimize costs and enhance security posture after concluding proofs of concept and demonstrations. Complete the following steps to delete the resources created in your AWS account:
- On the Amazon Bedrock console, delete the Amazon Bedrock knowledge base.
- On the Amazon S3 console, empty the
aiops-qdevcli-kb-xxxbucket. - On the AWS CloudFormation console, delete the CloudFormation stack.
As an alternative, try the preceding steps using natural language queries in Amazon Q Developer CLI.
- Finally, delete the
.amazonq/mcp.jsonfile from your workspace folder to remove the MCP configuration for Amazon Q Developer CLI.
Conclusion
In this post, we showed how Amazon Q Developer CLI interprets natural language queries, automatically converts them into appropriate commands, and identifies the necessary tools for execution. The solution’s intelligent error-handling capabilities analyze logs and perform auto-corrections, minimizing manual intervention. By implementing Amazon Q Developer CLI, you can enhance your team’s operational efficiency, reduce human errors, and manage complex environments more effectively through a conversational interface.We encourage you to explore additional use cases and share your feedback with us. For more information on Amazon Q Developer CLI and AWS MCP servers, refer to the following resources:
About the authors
 Biswanath Mukherjee is a Senior Solutions Architect at Amazon Web Services. He works with large strategic customers of AWS by providing them technical guidance to migrate and modernize their applications on AWS Cloud. With his extensive experience in cloud architecture and migration, he partners with customers to develop innovative solutions that leverage the scalability, reliability, and agility of AWS to meet their business needs. His expertise spans diverse industries and use cases, enabling customers to unlock the full potential of the AWS Cloud.
 Upendra V is a Senior Solutions Architect at Amazon Web Services, specializing in Generative AI and cloud solutions. He helps enterprise customers design and deploy production-ready Generative AI workloads, implement Large Language Models (LLMs) and Agentic AI systems, and optimize cloud deployments. With expertise in cloud adoption and machine learning, he enables organizations to build and scale AI-driven applications efficiently.